


আসসালামু আলাইকুম । আশা করি সবাই ভাল আছেন । আমরা যারা ওয়ার্ডপ্রেস এ সাইট করেছি , আমাদের প্রয়োজনে আমরা খুব সুন্দর সুন্দর প্লাগিন ব্যবহার করি । কিন্তু প্লাগিন ছাড়াই কিছু কোড ব্যবহারের মাধ্যমে হয়ত আপনি সেই কাজগুলো করতে পারেন । এতে যেমন আপনার সাইটের লোডিং স্পীড ভাল থাকবে , তেমনি ডিস্ক স্পেস কম ব্যবহার হবে , cpu কম ব্যবহার হবে । একটি সাইটে ছোট ছোট কি কি কাজ করতে হতে পারে তা এক নজরে দেখে নিই । যেমন-
১-৫ পর্যন্ত দেখতে নিচের লিংকে যান -
থিমে যদি হেডার ইমেজ অপশন না থাকে , তাহলে এখনই কাস্টম হেডার ইমেজ অপশন যোগ করে নিন ।
প্রথমে functions.php তে নিচের কোডটি যোগ করুন । আপনি এখান থেকে হেডার ইমেজ এর Width এবং Height প্রয়োজন মত পরিবর্তন করতে পারেন। এখানে %s/images/headers/ directory ব্যবহার করা হয়েছে । তাই আপনাকে /content/theme/images directory তে একটি ফোল্ডার তৈরি করতে হবে , যার নাম দিতে হবে headers . যেখানে আপনার আপলোড করা header image থাকবে । আপনি ইচ্ছা করলে ঐ directory পরিবর্তন করতে পারেন । পরিবর্তন করতে চাইলে নিচের url পরিবর্তন করুন ।
<?php
 /** Tell WordPress to run yourtheme_setup() when the 'after_setup_theme' hook is run. */
 add_action( 'after_setup_theme', 'yourtheme_setup' );
 if ( ! function_exists('yourtheme_setup') ):
 /**
 * @uses add_custom_image_header() To add support for a custom header.
 * @uses register_default_headers() To register the default custom header images provided with the theme.
 *
 * @since 3.0.0
 */
 function yourtheme_setup() {
 // This theme uses post thumbnails
 add_theme_support( 'post-thumbnails' );
 // Your changeable header business starts here
 define( 'HEADER_TEXTCOLOR', '' );
 // No CSS, just IMG call. The %s is a placeholder for the theme template directory URI.
 define( 'HEADER_IMAGE', '%s<span style="color: #ff0000;">/images/headers/forestfloor.jpg' );</span>
 // The height and width of your custom header. You can hook into the theme's own filters to change these values.
 // Add a filter to yourtheme_header_image_width and yourtheme_header_image_height to change these values.
 define( 'HEADER_IMAGE_WIDTH', apply_filters( 'yourtheme_header_image_width', 1000 ) );
 define( 'HEADER_IMAGE_HEIGHT', apply_filters( 'yourtheme_header_image_height',  198 ) );
 // Don't support text inside the header image.
 define( 'NO_HEADER_TEXT', true );
 // Add a way for the custom header to be styled in the admin panel that controls
 // custom headers. See yourtheme_admin_header_style(), below.
 add_custom_image_header( '', 'yourtheme_admin_header_style' );
 // … and thus ends the changeable header business.
 // Default custom headers packaged with the theme. %s is a placeholder for the theme template directory URI.
 register_default_headers( array (
 'berries' => array (
 'url' => '%s/<span style="color: #ff0000;">images/headers/berries.jpg',</span>
 'thumbnail_url' => '%s<span style="color: #ff0000;">/images/headers/berries-thumbnail.jpg',</span>
 'description' => __( 'Berries', 'yourtheme' )
 ),
 'cherryblossom' => array (
 'url' => '%s/images/headers/cherryblossoms.jpg',
 'thumbnail_url' => '%s<span style="color: #ff0000;">/images/headers/cherryblossoms-thumbnail.jpg',</span>
 'description' => __( 'Cherry Blossoms', 'yourtheme' )
 ),
 'concave' => array (
 'url' => '%s/images/headers/concave.jpg',
 'thumbnail_url' => '%s/<span style="color: #ff0000;">images/headers/concave-thumbnail.jpg',</span>
 'description' => __( 'Concave', 'yourtheme' )
 ),
 'fern' => array (
 'url' => '%s/images/headers/fern.jpg',
 'thumbnail_url' => '%s/<span style="color: #ff0000;">images/headers/fern-thumbnail.jpg',</span>
 'description' => __( 'Fern', 'yourtheme' )
 ),
 'forestfloor' => array (
 'url' => '%s/images/headers/forestfloor.jpg',
 'thumbnail_url' => '%s<span style="color: #ff0000;">/images/headers/forestfloor-thumbnail.jpg',</span>
 'description' => __( 'Forest Floor', 'yourtheme' )
 ),
 'inkwell' => array (
 'url' => '%s/images/headers/inkwell.jpg',
 'thumbnail_url' => '%s/images/headers/inkwell-thumbnail.jpg',
 'description' => __( 'Inkwell', 'yourtheme' )
 ),
 'path' => array (
 'url' => '%s/images/headers/path.jpg',
 'thumbnail_url' => '%s/<span style="color: #ff0000;">images/headers/path-thumbnail.jpg',</span>
 'description' => __( 'Path', 'yourtheme' )
 ),
 'sunset' => array (
 'url' => '%s/images/headers/sunset.jpg',
 <span style="color: #ff0000;">'<span style="color: #000000;">thumbnail_url' => '%s/</span>images/headers/sunset-thumbnail.jpg',</span>
 'description' => __( 'Sunset', 'yourtheme' )
 )
 ) );
 }
 endif;
 if ( ! function_exists( 'yourtheme_admin_header_style' ) ) :
 /**
 * Styles the header image displayed on the Appearance > Header admin panel.
 *
 * Referenced via add_custom_image_header() in yourtheme_setup().
 *
 * @since 3.0.0
 */
 function yourtheme_admin_header_style() {
 ?>
 <style type="text/css">
 #headimg {
 height: <?php echo HEADER_IMAGE_HEIGHT; ?>px;
 width: <?php echo HEADER_IMAGE_WIDTH; ?>px;
 }
 #headimg h1, #headimg #desc {
 display: none;
 }
 </style>
 <?php
 }
 endif;
 ?>
এবার header.php তে নিচের কোড যোগ করুন । loop খেয়াল করুন । অর্থাৎ কোথায় দেখাতে চান , যেমন হতে পারে মেনুর উপরে ।
<?php
 // Check if this is a post or page, if it has a thumbnail, and if it's a big one
 if ( is_singular() &&
 has_post_thumbnail( $post->ID ) &&
 ( /* $src, $width, $height */ $image = wp_get_attachment_image_src( get_post_thumbnail_id( $post->ID ), 'post-thumbnail') ) &&
 $image[1] >= HEADER_IMAGE_WIDTH ) :
 // We have a new header image!
 echo get_the_post_thumbnail( $post->ID, 'post-thumbnail' );
 else : ?>
 <img src="<?php header_image(); ?>" width="<?php echo HEADER_IMAGE_WIDTH; ?>" height="<?php echo HEADER_IMAGE_HEIGHT; ?>" alt="" />
 <?php endif; ?>
এবার dashboard-appearance এ আপনি Header অপশন দেখতে পাবেন । সেখান থেকে সুন্দর একটি হেডার ইমেজ আপলোড করুন ।
আপনার সাইটে Contact Form থাকা প্রয়োজন । কারন আপনার সাথে যোগাযোগের জন্য user দের জন্য একটি ব্যবস্থা থাকা দরকার ।
থিম থেকে index.php বা single.php নোট প্যাডে ওপেন করুন । এবার এখান থেকে আপনার প্রয়োজন মত যে অপশন গুলো Contact Form এ দেখাতে চান সেগুলো রেখে বাকিগুলো রিমুভ করুন । যেমন আপনি header , footer , sidebar এই অপশন গুলো রাখতে পারেন । তারপর header এর নিচে নিচের কোড যোগ করুন । এবার এটিকে page-contact.php নামে সেভ করুন । এবার এই page template টি /content/theme/ বরাবর আপলোড করে দিন ।
<?php

/*

Template Name: Contact

*/

?>

<?php

if(isset($_POST['submitted'])) {

if(trim($_POST['contactName']) === '') {

$nameError = 'Please enter your name.';

$hasError = true;

} else {

$name = trim($_POST['contactName']);

}

if(trim($_POST['email']) === '')  {

$emailError = 'Please enter your email address.';

$hasError = true;

} else if (!preg_match("/^[[:alnum:]][a-z0-9_.-]*@[a-z0-9.-]+\.[a-z]{2,4}$/i", trim($_POST['email']))) {

$emailError = 'You entered an invalid email address.';

$hasError = true;

} else {

$email = trim($_POST['email']);

}

if(trim($_POST['comments']) === '') {

$commentError = 'Please enter a message.';

$hasError = true;

} else {

if(function_exists('stripslashes')) {

$comments = stripslashes(trim($_POST['comments']));

} else {

$comments = trim($_POST['comments']);

}

}

if(!isset($hasError)) {

$emailTo = get_option('tz_email');

if (!isset($emailTo) || ($emailTo == '') ){

$emailTo = get_option('admin_email');

}

$subject = '[PHP Snippets] From '.$name;

$body = "Name: $name \n\nEmail: $email \n\nComments: $comments";

$headers = 'From: '.$name.' <'.$emailTo.'>' . "\r\n" . 'Reply-To: ' . $email;

wp_mail($emailTo, $subject, $body, $headers);

$emailSent = true;

}

} ?>

<?php if(isset($emailSent) && $emailSent == true) { ?>

<div>

<p>Thanks, your email was sent successfully.</p>

</div>

<?php } else { ?>

<?php if(isset($hasError) || isset($captchaError)) { ?>

<p>Sorry, an error occured.<p>

<?php } ?>

<form action="<?php the_permalink(); ?>" id="contactForm" method="post">

<ul>

<li>

<label for="contactName">Name:</label>

<input type="text" name="contactName" id="contactName" value="<?php if(isset($_POST['contactName'])) echo $_POST['contactName'];?>" />

<?php if($nameError != '') { ?>

<span><?=$nameError;?></span>

<?php } ?>

</li>

<li>

<label for="email">Email</label>

<input type="text" name="email" id="email" value="<?php if(isset($_POST['email']))  echo $_POST['email'];?>" />

<?php if($emailError != '') { ?>

<span><?=$emailError;?></span>

<?php } ?>

</li>

<li><label for="commentsText">Message:</label>

<textarea name="comments" id="commentsText" rows="20" cols="30"><?php if(isset($_POST['comments'])) { if(function_exists('stripslashes')) { echo stripslashes($_POST['comments']); } else { echo $_POST['comments']; } } ?></textarea>

<?php if($commentError != '') { ?>

<span><?=$commentError;?></span>

<?php } ?>

</li>

<li>

<input type="submit">Send email</input>

</li>

</ul>

<input type="hidden" name="submitted" id="submitted" value="true" />

</form>

<?php } ?>
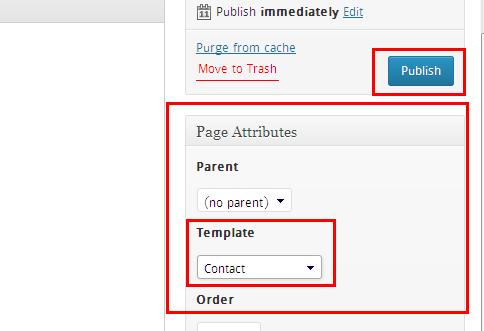
এবার dashboard- pages থেকে add new page এ যান । ডান পাশে page attributes এ Template হিসেবে Contact সিলেক্ট করুন । এবার একটি টাইটেল দিয়ে এটি পাবলিশ করুন ।
এবার dashboard-appearance-menus এ এই পেজটি add করে মেনু সেভ করুন । হয়ে গেল contact ফরম । আর ওয়েব মেইল নিয়ন্ত্রণের জন্য cpanel দেখুন ।
আগামীতে বাকি কোড গুলো পাবেন । ভাল থাকবেন ।
আমি জাহিদ ইসলাম। বিশ্বের সর্ববৃহৎ বিজ্ঞান ও প্রযুক্তির সৌশল নেটওয়ার্ক - টেকটিউনস এ আমি 13 বছর 1 মাস যাবৎ যুক্ত আছি। টেকটিউনস আমি এ পর্যন্ত 69 টি টিউন ও 617 টি টিউমেন্ট করেছি। টেকটিউনসে আমার 1 ফলোয়ার আছে এবং আমি টেকটিউনসে 0 টিউনারকে ফলো করি।
Khub kajer post…onik donnobad upnake.Asha rakhe samner din gula te ei rokom aro sundor post amader upohar diben.Valo thakben.
অনেক কাজের টিউন প্লাগিন ছাড়া কোডের কাজ @ ধন্যবাদ টিউনের জন্য আর জাহিদ ইসলাম ভাই আমার সাইট Log out /সাইন আউট কোডটা কেমন হবে/ http://hossianbd.com/logout এটা দিয়েছি কাজ হচ্ছে না সঠিক কোড টা দিবেন।
অনেক কাজের টিউন প্লাগিন ছাড়া কোডের কাজ @ ধন্যবাদ টিউনের জন্য আর জাহিদ ইসলাম ভাই আমার সাইট এর জন্য Log out /সাইন আউট কোডটা দিবেন। আমার ইমেইল [email protected]
সুপ্রিয় টিউনার,
আপনাকে ধন্যবাদ টেকটিউনস কমিউনিটিকে সুন্দর সব টিউন উপহার দেয়ার জন্য।
আপনার টিউনে কিছু ফরম্যাটিং ভুল ছিলো, যা প্রথম বারের মত টেকটিউনস মডারেটর এডিট করে দিয়েছে। আগামীতে টিউন করার সময় উক্ত বিষয় গুলো খেয়াল রাখার জন্য অনুরোধ রইলো।
১. টিউনে অযথা অতিরিক্ত সাব-হেডিং (h2, h3) ব্যবহার করবেন না।
২. বিশেষ প্রয়োজন ব্যতীত টিউনের লেখায় মাত্রাতিরিক্ত কালার ব্যবহার করবেন না।
৩. প্রয়োজনীয় স্থানে বুলেট পয়েন্ট ব্যবহার করুন।
৪. টিউনে প্রোগ্রামিং কোড ব্যবহারের জন্য টেকটিউনস সিন্টেক্স হাইলাইটার ব্যবহার করুন। এর জন্য নিচের টিউনটি দেখতে পারেনঃ
https://www.techtunes.io/web-design/tune-id/77692
৫. টিউনে পর্যাপ্ত পরিমাণ বৈষয়িক ইমেজ ব্যবহার করুন।
৬. ধারাবাহিক টিউনের ক্ষেত্রে টিউনের শিরোনাম ঠিক মত দিন। যেমনঃ
ধারাবাহিক টিউনের নাম [পর্ব-০১] :: টিউনের বিষয় বস্তু
টিউন করতে থাকুন, টেকটিউনসের সাথে থাকুন, মেতে উঠুন প্রযুক্তির সূরে!
Hello vaiya auto g-mail make hobe eirokom kono soft ache apnar kache thakle please share korben !
THESE ARE THE POSTS WHICH I AM LOOKING FOR. THANK YOU SO MUCH ZAHID VHAI.
AND I AM WAITING FOR YOUR NEXT POST ABOUT CUSTOMIZING WORDPRESS.


")
")

")
")
আচ্ছা ভাই আমার এই প্রশ্নটার উত্তর দিতে পারবেন?
https://www.techtunes.io/help-ask/tune-id/243488